- October 6, 2024
To fix scratches on wood floor, clean the area, sand it lightly, apply wood filler, stain if necessary, and finish with a protective coat. Sounds easy?
Wood floors can be susceptible to scratches from pets, furniture, or daily wear and tear. It makes your floors start looking older. But obviously, there are many ways to remove these scratches and make your hardwood look new. Knowing how to repair these scratches effectively is essential for maintaining the integrity and aesthetics of your flooring. This guide will walk you through assessing, repairing, and preventing deep scratches on wood floors, helping you restore their original shine.
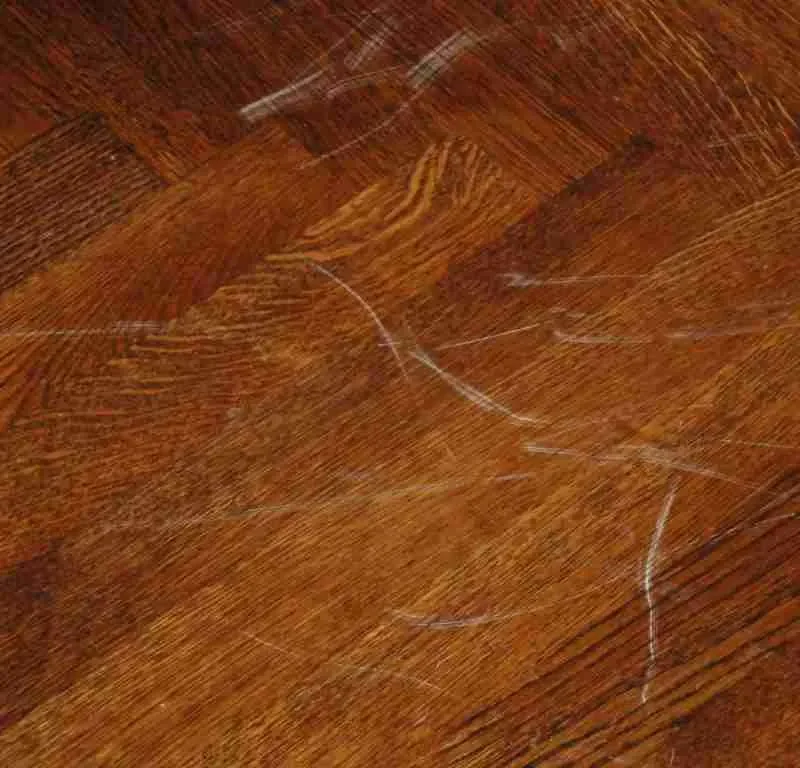
Scratches on wood floors can vary in depth and severity, impacting the finish and the wood itself. Common types include:
- Surface Scratches: Affect the finish and can often be fixed with a simple touch-up or a buffing solution.
- Deep Scratches: Penetrate through the finish and into the wood. These require extensive sanding and filling.
- Dents: Caused by heavy objects. These require specialized techniques like steam treatment.
This guide aims to provide a clear, step-by-step process for assessing and repairing deep scratches on wood floors. This will maintain your flooring’s beauty over time.
Assessing the Damage and Repairing It
Assessing the damage is the first step of the guide “how to fix scratches on wood floor”. Evaluating the damage involves identifying the depth and severity of the scratches, determining if the finish is damaged, and deciding whether to proceed with DIY repairs or seek professional help.
Identifying the Depth and Severity of Scratches
The first step in repairing scratches is to assess the damage. Light surface scratches are usually easier to fix than deep ones. That’s why this may require more attention. Here’s how to identify the severity:
- Surface Level: Run your fingers over the scratch. If it feels smooth and doesn’t catch, it’s just a surface scratch.
- Depth Check: If you can feel a groove or indent, the scratch is deeper. It will require more extensive repair methods.
Determining if the Finish is Damaged
It’s important to assess whether the finish is also damaged:
- Shiny vs. Dull: A shiny area may indicate an intact finish. A dull or rough patch may signal damage to the finish.
- Color Variations: If the scratch appears lighter than the surrounding wood, it’s a sign that the finish has worn away. It exposes raw wood.
Deciding Between DIY Fixes and Professional Help
Many minor scratches can be addressed with DIY methods. But for extensive damage, it might be wise to consult a professional. Here are some factors to consider:
- The extent of Damage: If the scratches cover a large area or multiple boards are affected, consider hiring a professional.
- Time and Tools: Assess whether you have the time and tools required for a proper repair. If not, it might be better to seek help.
Gather the Necessary Tools
Before starting the repair process, gather the necessary tools and materials to ensure a smooth workflow:
Tools Needed
- Sandpaper: Various grits (80, 120, 220)
- Putty Knife: For applying filler
- Soft Cloths: For cleaning and applying finishes
- Vacuum or Broom: To remove dust and debris
- Clean Sponge or Cloth: For damp cleaning
Materials Required
- Wood Filler or Putty: To fill deep scratches
- Stain: To match the color of your wood floor (if necessary)
- Polyurethane or Finish: For protective coating
Safety Equipment
- Dust Mask: To protect against inhaling dust
- Gloves: To keep your hands safe
- Safety Goggles: To shield your eyes from debris
Gather the Necessary Materials
Blending Pencils
Blending pencils are a fantastic option for fixing scratches on wood floors. Available in many shades, you can choose one that closely matches the color of your flooring. When applied correctly, these pencils can make scratches nearly undetectable.
Wax Sticks
Like blending pencils, wax sticks are ideal for filling in deeper scratches. They are simple to apply and can be buffed to blend with the surrounding wood.
Coconut Oil
Surprisingly, coconut oil is not just for culinary use! This multifunctional product can help diminish the visibility of small scratches on your wood floors. It seeps into the scratches, darkening them to match the surrounding wood.
Apple Cider Vinegar and Olive Oil
A DIY mixture of apple cider vinegar and olive oil is an economical remedy to fix scratches on wood floor. The vinegar’s acidity helps clean the scratch, while the olive oil restores the wood’s natural color and luster.
Wood Stain
For deeper scratches, applying a wood stain may be necessary. Wood stains are available in various colors, allowing you to match them to your floor for a cohesive repair. They not only cover the scratches but also offer protection against further damage.
Protective Coating
After addressing the scratches, a water-based protective coating should be applied. This adds a layer of defense for your floors and prevents future scratches and wear.
Wood Filler
Wood filler is essential for tackling deep scratches and gouges. Once applied, it can be sanded down and finished with a matching stain and protective coating to achieve a flawless appearance.
Step-by-Step Repair Process
Now that you have everything ready, follow these steps to fix scratches on wood floor.
Clean the Area
- Remove Dust and Debris: Start by thoroughly vacuuming or sweeping the area around the scratch. Dust and debris can interfere with the repair process.
- Damp Clean: Wipe the scratched area with a damp cloth to ensure it’s free from any remaining particles. Avoid soaking the wood, as excess moisture can cause further damage.
Sanding the Scratch
- Choose Appropriate Sandpaper Grit: Start with 80-grit sandpaper for deep scratches. Gradually move to 120-grit, and finish with 220-grit for a smooth surface.
- Lightly Sand the Area Around the Scratch: Sand in the direction of the wood grain to avoid creating new scratches. Be gentle and avoid sanding too deeply.
- Wipe Away Dust: Use a clean cloth to remove any dust. This ensures that the filler adheres properly.
Filling the Scratch
- Apply Wood Filler or Putty: Choose a filler that matches the wood color. Using a putty knife, scoop out the filler and press it firmly into the scratch.
- Ensure Even Application: Smooth the filler at the level of the surrounding wood. This will help create a seamless appearance once repaired.
- Allow to Dry: Follow the manufacturer’s instructions for drying time. This can vary but typically takes at least 30 minutes to a few hours.
- Staining (If Necessary)
- Match Stain to the Floor Color: If the filler is not an exact match for your floor, you may need to stain it. Test the stain on a small, inconspicuous area first to ensure it matches.
- Apply Stain: Using a cloth or brush, apply the stain to the filled area. Blend it into the surrounding wood for a natural look.
- Let It Dry: Allow the stain to dry completely. Depending on the product, this could take a few hours.
- Finishing Touches
- Apply Polyurethane or Finish: To protect your repair, apply a thin layer of polyurethane or floor finish over the repaired area.
- Feather the Edges: Use a clean cloth or brush to feather the edges, blending the new finish with the existing floor.
- Allow to Dry Completely: After the finish dries you can walk to the repaired area. This can take anywhere from a few hours to overnight.
Preventing Future Scratches
After repairing your wood floors, it’s crucial to take preventive measures to avoid future scratches.
Use Rugs and Mats in High-Traffic Areas
Place rugs or mats in entryways and high-traffic zones to protect your floors from dirt and wear. This simple step can significantly reduce the likelihood of scratches.
Maintain Proper Humidity Levels
Wood floors are sensitive to changes in humidity. Keep indoor humidity levels between 30% and 50% to minimize expansion and contraction that can lead to damage.
Regular Cleaning and Maintenance Tips
Regularly clean your wood floors with a soft broom or vacuum designed for hardwood. Avoid water or steam cleaners, as excess moisture can warp or damage the wood.
Consider Protective Pads for Furniture
Attach felt pads to the legs of furniture to prevent scratches when moving items. Replace these pads regularly to ensure they remain effective.
How Much Does Scratched Wood Floor Repair Cost?
Repairing scratched wood floors can vary significantly in cost depending on several factors. They include the extent of the damage, the methods used, and whether you choose to tackle the repairs yourself or hire a professional.
1. DIY Repairs
If you opt for a do-it-yourself approach, the costs are lower. Here’s a breakdown of potential expenses:
- Materials: Basic materials such as wood filler, blending pencils, wax sticks, coconut oil, or DIY cleaning solutions like apple cider vinegar and olive oil typically range from $10 to $50, depending on the products you choose and the number of scratches you need to repair.
- Tools: If you don’t already have tools like sandpaper, putty knives, or brushes, you may need to invest an additional $20 to $100. Many of these tools are versatile and can be used for future projects.
- Time: While DIY repairs can save money, consider the value of your time. Depending on your skill level and the severity of the scratches, you may spend several hours completing the repairs.
2. Professional Repairs
If the scratches are deep or extensive, or if you prefer to hire a professional, costs can increase significantly. Here’s what to expect:
- Assessment Fees: Many professionals charge an assessment fee from $50 to $100 to evaluate the damage.
- Repair Costs: Professional wood floor repair services typically charge between $75 and $150 per hour. For minor repairs, you might pay around $100 to $300 for the whole job, while more extensive damage can escalate to $500 or more, especially if refinishing is required.
- Refinishing: If the scratches cover a large area or the floor is worn out, refinishing the entire floor may be necessary. This process costs $2 to $5 per square foot, leading to total costs from $1,000 to $3,000 for larger spaces.
3. Factors Affecting Cost
Several factors can influence the overall cost of scratched wood floor repairs:
- Severity of Damage: The deeper and more extensive the scratches, the more time and materials will be needed, increasing costs.
- Type of Wood: Certain hardwoods may require special care or products, which can add to the cost.
- Location: Prices for labor and materials can vary by region, with urban areas typically being more expensive than rural locations.
- Type of Finish: If your wood floor has a unique finish or stain, matching it may require specialized products, which affects the total cost.
When to Seek Professional Help?
If the scratches are extensive, or if you’re unsure about any part of the repair process, don’t hesitate to seek professional assistance. A flooring expert can provide a thorough assessment and restore your wood floors to their original beauty.
If you have questions or need guidance on specific repairs, contact us at Elephant Floors. We’re here to help with all your flooring needs!
Conclusion
Addressing scratches on your wood floors is crucial for preserving their aesthetic appeal and ensuring long-term durability. Over time, even minor scratches can accumulate dirt and moisture, leading to more significant damage if left unattended. By being proactive, you can keep your floors looking pristine and inviting, enhancing the overall ambiance of your home.
Simple practices such as regular cleaning, using rugs in high-traffic areas, and maintaining optimal humidity levels can significantly reduce wear and tear. Investing time in their upkeep protects your floors and enhances their natural beauty, allowing you to enjoy the warmth and character that wood flooring brings to your surroundings.
We invite you to share your experiences or ask questions about maintaining your wood floors. Every homeowner’s journey is unique. At Elephant Floors, we’re committed to helping you achieve the best results for your home through expert advice and tailored solutions. Your satisfaction and the longevity of your wood floors are our top priorities!